I put together a few documents related to using Bones. I've submitted these to the Craft section of the website, but as it may be a little while before Reaper has the time available to add them, Bryan suggested that I post them here.
Bones - Frequently Asked Questions
Bones - Preparation (mould line removal, glue, putty, etc.)
Bones - The First Coat is the Difference (this document)
--------------------------------------------------------------------------------------------------------------------
Painting Bones Miniatures: The First Coat is the Difference
One of the revolutionary features of Bones miniatures is that you can paint them straight out of the package. Because this is such a departure from recommendations for painting metal or resin miniatures, it is understandable that this feature raises questions and concerns for painters unfamiliar with Bones. Painters familiar with other types of miniatures will find that there are some differences in how the first coat of paint behaves, or that there are painting techniques or substances that require a little tweaking to use as a first coat on Bones figures.
The Bones material is a little hydrophobic, meaning that it tends to repel water. Paint diluted with water, sometimes even just a little water, may display a tendency to bead up or pull away from crevices or higher raised areas. The more water added to the paint, the greater this effect. The first coat of paint applied to the surface can also take a little longer to dry than usual.
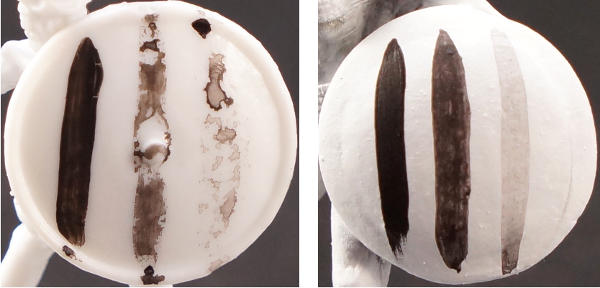
![bones-coat0-dilute-sm.jpg]()
The image on the left is a Bones figure straight out of the blister, the one on the right is a primed Dark Heaven metal miniature. Each was painted with a brushstroke of Master Series Walnut Brown paint of various dilutions. From right to left: undiluted; 1:1 paint water ratio; heavily diluted. On the Bones figure, the stripes painted with diluted paint display beading and pulling away, but the stripe painted with undiluted paint covers smoothly with clean edges.
Once you apply a first coat of paint, primer or other appropriate surface preparation to a Bones miniature, you can freely use paint of any dilution and the full array of painting techniques!
Painters who prefer to use thinned base coats, those who like to start with a dark wash over white primer, and those who use black or custom coloured primer need not despair! The following information will help you find ways to tweak your preferred techniques to work with the Bones material. It also includes information about brands of primer, paint and other substances that are known to work or not work well with Bones, and tests of the utility and durability of certain of these products on Bones.
Slightly Thicker Paint Will Not Obscure All the Sculpted Details
For years painters have been reading tips and tutorials that exhort them to thin their paints so as not to obscure the detail sculpted into their figures, and to obtain a better quality paint job. While it’s definitely the case that using excessively thick paint can affect detail and paint quality, I think it is also true that some people are worrying too much about this in regards to painting Bones.
Reaper Master Series and Master Series HD are produced with a consistency pretty close to ideal for base coats. Several other miniature paint lines are produced in a similar consistency, or require only a small amount of water to reach the correct consistency. Two or three layers of such paint will not clog up all the detail on your model.
Also, remember that when you paint metal or resin miniatures, you normally paint over a coat of primer. One layer of undiluted paint on a Bones miniature is equivalent in thickness (if not thinner) than one or two coats of primer on a metal or resin figure.
![bones-coat1-sm.jpg]()
The picture above is of four Bones bases. The tiny text relief sculpted into the bottom of these is a perfect way to test whether paint coats obscure small detail. Each of these bases was given four coats of a substance, and then brushed over with a paint wash to bring out the detail. (The bottles of paint and primer used in this test were fairly fresh, no more than a year or two old.)
From left to right, the bases were coated with four coats of undiluted Master Series Pure White, four coats of undiluted Master Series White Primer, and four coats of undiluted Master Series Brush-On Sealer. I prepared a second base with the Brush-On Sealer as the wash didn’t quite turn out on the first. The word ‘Miniatures’ has lost a little detail on the base coated with four undiluted coats of paint, but apart from that both it and the primer coated base still have excellent detail. The text is still mostly legible on the bases coated with Brush-On Sealer, but some detail has been obscured.
Wash Bones Figures Before Painting
Many people find that the paint is less likely to bead up if the figure has been washed. Also, if you’ve had your figure out of the blister for a while, or you’ve handled it to remove mould lines or otherwise prepare it, you should clean it before painting, as it probably has dust and skin oils on it that may repel paint or cause paint to chip off after it has dried. All you need to clean it is some dishwashing liquid and an old toothbrush. Give it a scrub, and then rinse it really well to get off all the soap. Let it dry before painting. (You can hurry up the drying with a hairdryer set on low.)
Black Primer? Custom Colours? Paint One Coat of Paint over the Entire Figure First!
Some painters prefer to paint over black or gray primer. Others start with a primer of a particular colour to speed up painting units. For example, you could paint a coat of khaki on a unit of modern army figures and be half way finished painting their uniforms. One way to get the same effect as a dark wash over white primer on Bones is to first apply an all-over coat of white paint, followed by a dark wash. (Keep reading for other ways to do washes directly on Bones.)
Some Primers Work on Bones
Traditional metal or resin miniatures need to be primed before any paint is applied. Paint applied over bare metal does not adhere well, and rubs off with even light handling. Primer etches into the metal on a microscopic level. Paint adheres well to primer, so using it forms a stronger bond. Bones figures do not suffer from this issue! Acrylic paint painted directly onto the Bones surface is as durable, if not more durable, than if you use paint over primer on Bones.
If you still prefer to use primer, Reaper’s Brush-On Primer works well on Bones, and is available in black and white.
Another product people sometimes ask about is gesso. Fine arts painters use gesso to prepare canvases for painting. Some people have experimented with liquid gesso as a primer for miniatures, Bones and otherwise. People have reported it working in terms of creating a surface that you can paint thinned paint over. Reports vary as to how durable the material is, so it may not be the best choice for miniatures that are going to be handled.
For those who prefer to use spray primer, the best option is to use an airbrush to apply a coat of acrylic paint to the Bones figure. Reaper Master Series paint thins well with Golden or Liquitex Airbrush Medium, and maintains its strong adhesion, though I have found that adding airbrush medium does noticeably increase the drying time of the paint.
Aerosol spray primers and some spray paints can have some issues with Bones (and with other plastics). The chemicals in some of these primers and paints do not react well with Bones. The main effect seems to be that the primer never completely cures, remaining tacky to the touch. Some will also fail to form a bond with the Bones material.
The following is a list of aerosol paints and primers that people on the Reaper forums have reported testing on Bones. Please consider the list just a guide. The best idea is to test your chosen spray by using it on a small Bones figure you don’t care about a lot. After you give the spray time to cure, carefully look over the figure to make sure the chemicals in the spray haven’t reacted with the Bones material to melt or otherwise damage it. If not, test the primer surface by touching it to see if it stays too tacky to paint over. Also, flex parts of the figure to make sure the primer doesn’t crack.
Note: Some people have successfully used Krylon primer, and possibly other spray primers that some people have reported as problematic. And other people have reported problems with primers that some felt worked well. One difference seems to be that a light spray rather than a heavy coating is more likely to minimize tackiness. Environmental factors such as temperature and humidity are also always a big variable with any spray product.
Recommended aerosol spray primers and paints:
Army Painter white and coloured primers
Krylon Dual Paint + Primer
Duplicolor Sandable – slight tackiness possible
Rust-oleam Painter’s Touch Ultra Cover 2x – slight tackiness possible
Problem aerosol spray primers and paints:
Krylon white primer – doesn’t bond, stays tacky
Testors Enamel flat black – stays tacky
Walmart Valu flat white – stays tacky
Krylon Primer red-brown – stays tacky
Citadel spray
Use a Medium to Thin Your Paint or Make a Wash
Water is the element in thinned paint that causes it to bead up on the Bones surface. If you try thinning your paint with a dilutant other than water, you may be able to create a mix that is closer to the consistency you like to paint with. Depending on what you use, you can even create something translucent enough to act as a wash or glaze directly on the Bones.
Mediums designed to work with acrylic paints are good products to try. Examples are matte medium, glazing medium, airbrush medium. Reaper’s Brush-On Sealer can be used this way. Note that many of these products are a little less fluid than water, so they may not dramatically change the consistency of the paint (it’ll still feel a little thick rather than watery, but it will look a lot more transparent). You can also test adding just a drop or so of water to your mix of paint and medium to see if you can get closer to the consistency you prefer.
![bones-coat2-washes-sm.jpg]()
I diluted some Master Series Bone Shadow with various mediums to make washes. From left to right, the products are listed below.
Master Series Brush-On Sealer: I added one drop of water to a large drop of paint and several drops of Sealer. Worked well.
Liquitex Matte Medium: A thick product. I added a drop of water. Beads up too much to work well for a wash.
Liquitex Glazing Medium: Another thick product, I added a drop of water to my mix. Took longer to dry than the others. Did not sit in crevices well enough to work well for a wash. Very shiny finish.
Folk Art Glass & Tile Medium: Applied well, dried quickly. Even application of the colour.
Delta Ceramcoat All-Purpose Sealer: Worked decently, seems a bit more inclined to pool in the crevices with less colouring on the surfaces. Shiny finish.
ADDEDUM (not pictured)
Golden Acrylic Flow Release (undiluted): Applied well. Took a little while to dry. Shiny finish.
Reaper Flow Improver: Applied well. Took a little while to dry. Finish is shiny in areas where wash pooled.
Use a Medium as a Primer
Because of how well acrylic based products adhere to the Bones material, it is also possible to use mediums as a primer alternative. Once dry, you can paint over them using thinned paint. These are applied by brush, or possibly with an airbrush.
I tested a number of different brush-on products on some Bones Cave Trolls. These were straight out of the package and had not been cleaned. After the products dried, I applied a thin coat of paint to see how it behaved over each product.
![bones-coat3-primer-alts-sm.jpg]()
Reaper Master Series Brush-On Primer: Exhibited slight pulling away from some high or curved surfaces, though generally it just required running the brush over that section again to establish coverage. Dried quickly.
Reaper Master Series Brush-On Sealer: No significant beading. Dried quickly. Paint was less durable than with the other products, see the durability testing section for more details and pictures.
Golden Airbrush Medium: Bubbled a bit when applied, thin enough to pool a bit in depressions. Took more than 40 minutes to dry. This product works well if you use a drop or three to thin paint down for a base coat, although it does increase the drying time slightly. Due to it drying time, this is not the best choice as a primer alternative or for thinning washes that will be applied directly over Bones.
Liquitex Matte Medium: Somewhat thick. Minor beading and pulling away. Significant beading when thinned with water. Dried quickly. When paint was applied, there were still some mild occurrences of paint pulling away from higher/curved areas.
Liquitex Glazing Medium: Pretty thick consistency. Dried fairly quickly. The paint coat still beaded a little.
Folk Art Glass & Tile Medium: Dried fairly quickly. Paint went on quite nicely. Also works on metal miniatures.
Delta Ceramcoat All-Purpose Sealer: Dried quickly. The paint layer exhibited slightly pulling way.
Folk Art Blending Gel: Extremely thick. Beaded up too much to use. Not pictured as it worked too poorly to continue to the testing stage.
Speed Paint Drying with a Hairdryer
Whether on a Bones or metal miniature, if you find that your paint is taking too long to dry, you can speed up the drying by using a hairdryer on the low setting on the paint. If the paint you’re drying is a wash, you should let it dry naturally for a little bit, or you risk blowing the paint out of the crevices and depressions you want to darken.
Testing the First Coats for Durability
Once you get your paint applied, you want to make sure that it stays there. In my experiments, the most durable Bones miniatures are those where the first coat applied to the miniature is undiluted Master Series paint. Several of the other substances I tested were pretty close in durability, but it should be noted that there were a few that performed poorly.
![bones-coat4-dura1-sm.jpg]()
I painted these ghosts in August 2012. They accompanied me to Gen Con and Pax Prime 2012, stored loose with some unpainted Bones in a plastic container I carried in my backpack. Their travels included a six hour car ride and return plane trip. At the conventions they were handled extensively by dozens upon dozens of people, including being tossed on tables. The paint jobs were stressed pretty much equally through the Gen Con trials. The ghost painted only with Reaper Master Series paint was handled a lot more than the others during the Pax Prime trials.
The ghost sculpt has some thin and thus particularly bendy areas, most notably on the hood and where it meets the tombstone. I flexed these parts by hand repeatedly to additionally stress the paint. Unfortunately I chose poor colours to easily be able to see all the damage in the photos.
After the first coat I used painting techniques of thinned layers and washes with no difficulty and with the same effect on each of the miniatures. From left to right the first coat on each miniature was as follows.
Undiluted Reaper Master Series Paint: Displayed the least damage during the Gen Con trials. Following Pax, has some chips at the flex point on the hood and near the tombstone. Was handled a lot more than the other figures.
Reaper Master Series Brush-On White Primer: A few very small chips at the flex points, and some paint has scraped off a few sharp protruding areas. (Edge of the hood, finger tips on one hand.)
Dupli-Color Sandable White Primer Spray: The unpainted base stayed slightly tacky to the touch for weeks after priming. The figure has several small areas where paint was scraped off, but only one chip on a flex point.
Testors Dullcote Spray: This product created a good surface for painting, but performed very poorly in the paint durability tests, and I would not recommend using it as a primer substitute if you plan to use your Bones for gaming. Chips formed on the major flex points early in the Gen Con testing, and the paint has flaked off extensively from there. The figure also has some small areas of scraping damage, but those are no more notable than on the Brush-On Primer or Dupli-Color figures.
![bones-coat5-dura2-sm.jpg]()
I wanted to perform a similar test with the other surface preparation products I tried. First I painted on an additional coat or two of paint. Then I placed the figures loose in a plastic box with some other Bones, a wooden, MDF and plastic base, and a metal figure. After wrapping the box in a towel secured with rubber bands, I put it in my dryer on the air setting for 10 minutes or so. The green painted areas on each figure are those that were painted over the primer alternatives. The brown painted areas are Master Series Paint directly on the Bones surface. (These were part of tests for methods to remove mould lines.) The brown areas on each exhibit very little damage. Some have none, some have a few small chips or scrapes. (However it should be noted the brown area of this sculpt has far fewer surface protrusions than where the green was painted.)
![bones-coat6-dura3-sm.jpg]()
From left to right: Reaper Master Series Brush-On Primer White; Reaper Master Series Brush-On Sealer; Golden Airbrush Medium; Liquitex Matte Medium.
Three of the four show pretty similar levels of damage. The figure painted with Brush-On Sealer as a primer displays the most paint damage of all figures tested in this series.
![bones-coat7-dura4-sm.jpg]()
From left to right: Liquitex Glazing Medium; Folk Art Glass & Tile Medium; Delta Ceramcoat All-Purpose Sealer.
Damage levels are pretty similar to the better performers above. The Folk Art Glass & Tile Medium and Liquitex Glazing Medium performed the best of the seven products tested. (The Folk Art Glass & Tile Medium performed better in terms of acting as a primer, and is inexpensive, so would be my recommendation between those two.)